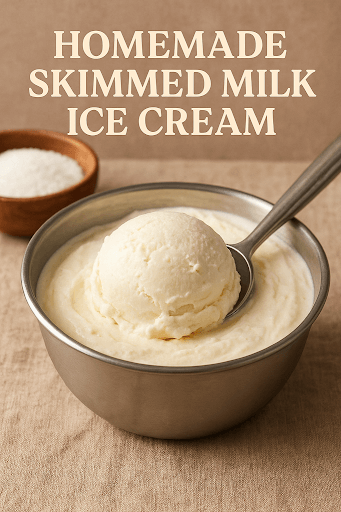
There’s a certain charm in making ice cream at home. Not with fancy gelato makers or polished café counters, but in the old-fashioned way—just a sturdy steel bowl, a spoon clinking against its sides, and that childlike thrill every time you peek into the freezer wondering, “Has it set yet?”
But here’s the twist: this isn’t your usual heavy-cream ice cream. We’re working with skimmed milk. Yes, it’s lighter and lower in fat, but if handled carefully, it still turns into something smooth and indulgent. The kind of ice cream that lingers on your tongue, slowly melting, instead of vanishing like an ice cube dropped in water.
Why Skimmed Milk?
A lot of people think ice cream without cream is just sweetened ice.
But here’s the secret — texture is all about technique. With a few small tricks (and some patience), skimmed milk can surprise you. It gives you that creamy indulgence, without the heaviness.
Ingredients You’ll Need
- 500 ml chilled skimmed milk
- 100 g sugar (or as your sweet tooth demands)
- 2 tbsp cornflour – the magic for smoothness
- 3 tbsp milk powder – optional, but adds richness
- 1 tsp vanilla extract (or a pinch of cardamom for an Indian soul)
Step-by-Step: The Slow, Sweet Process
1. The secret paste
Take 4–5 tablespoons of skimmed milk in a small cup. Stir in the cornflour until there’s not a single lump. This little mix is our insurance policy against an icy texture later.
2. The gentle simmer
Pour the rest of the milk into a heavy-bottomed pan. Add sugar and milk powder. Keep the flame low — no rushing here. The aroma of warm milk is part of the experience.
3. Thickening the base
Once the milk starts steaming, pour in the cornflour mixture slowly, whisking as you go. Watch it thicken ever so slightly. The goal? Coating the back of a spoon — not pudding-thick, just enough to feel a difference.
4. The fragrance moment
Switch off the flame. Stir in the vanilla extract (or cardamom if you’re feeling nostalgic). Let it cool. This is when your kitchen starts smelling like childhood.
5. First freeze
Pour this mixture into a stainless steel bowl. Cover it, and pop it into the freezer for about 2–3 hours. When you check, it should be half-set — not rock solid.
6. Breaking the ice (literally)
Here’s the traditional magic: take the half-frozen mixture and whisk it well to break up ice crystals. No electric gadgets? A simple fork or whisk works fine. If you do have a blender, give it a quick whirl.
7. Repeat for creaminess
Freeze again for 2 hours, whisk again. Repeat this two or three times. Yes, it’s a little work, but this is what transforms skimmed milk from “frozen milk” into “ice cream.”
8. The final sleep
Let it rest overnight in the freezer. In the morning, scoop it out and… well, you’ll know from the first bite why this method is worth the wait.
Serving Ideas
- Top with chopped nuts for a kulfi-style treat.
- Drizzle with chocolate sauce for the classic café vibe.
- Serve plain in a steel tumbler for that old-fashioned Indian summer feel.
A Little Note
If you want it even richer, swap 50 ml of the skimmed milk for condensed milk. Or for a chocolatey version, stir in 2 tablespoons of cocoa powder when heating the milk.
When you finally sit down with that bowl of homemade skimmed milk ice cream, you’ll realise — the joy isn’t just in eating it.
It’s in the small rituals. The whisking. The waiting. The way the freezer door feels cool against your face when you peek inside.
That’s not just ice cream. That’s nostalgia you can taste.

Leave a Reply